
iGuide icons
Disappears after a few seconds. Press Info to have it reappear and Exit to make it disappear again. Display duration is configurable from the Setup Menu.
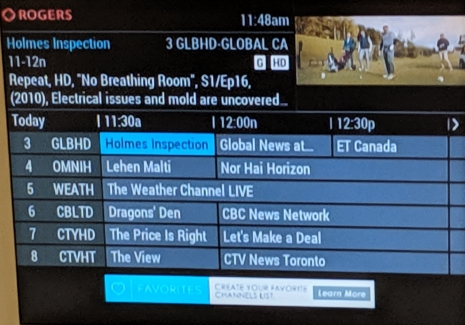
Pressing Info a second time allows access to recording, reminder, favourite, lock, or other air times for the selected show.
The Flip Bar may offer other options like Watch in HD or ON Demand. Use the arrow keys and OK/Select to access.

Use the arrow keys to move through the listings.
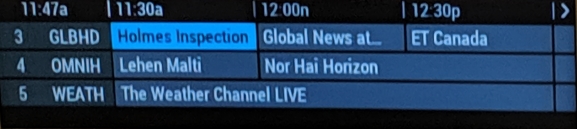
To see Program Listings Press Guide.
Listings start at the current channel and time.
Listings by time
- Move around with the arrow keys
- Page around with Page Up or Page Down, and << and >>
- Jump a Day ahead or back with Day+ or Day-
Program Info shows in the upper-left portion of the screen.
- Press OK/Select to choose a channel
- Press in a channel to jump to that channel
- Press Info to get Program details and setup recordings, reminders, locks or favourites
- Press Exit to return to CATV
Listings by Channel
- To see listings by just one channel highlight that channel and press Guide
- Move around with the arrow keys
- Page around with Page Up or Page Down, and << and >>
- Jump a Day ahead or back with Day+ or Day-
- Press Guide to exit to full channel listings
Program Guide Icons and Colour Codes:
iguide_program_guide_icons
The Quick Menu lets you jump to popular iGuide functions.
Access it by pressing the Menu button on your Rogers remote once.
Use the < > arrow buttons on your remote to move through the icons and OK/Select to make a selection.

There you have access to all of the features offered by i-Guide.
Use the arrow keys to move through the options, and press OK/Select to make a selection.
To go back at any point, press the Last button. To return to the program that is airing, press the Exit button.
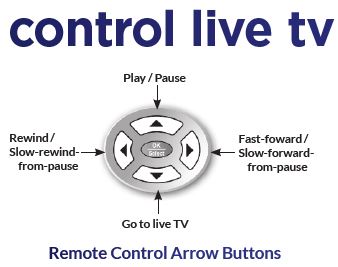
With a DVR, you can control live TV. When you tune to a channel, the DVR automatically
starts a temporary recording of the program so you can pause, resume, and replay live TV.
With the arrow buttons, you can pause, resume, and replay live TV without having to set up a
recording. You can also use the arrow buttons with recorded shows.
PAUSE
Pause live TV by pressing the up-arrow button on your remote control.
PLAY
Press the up-arrow button again to resume program playback.
REWIND / SLOW-REWIND FROM PAUSE
Press the left-arrow button to rewind — or to slow-motion rewind from a pause.
FAST-FORWARD / SLOW-FORWARD FROM PAUSE
Press the right-arrow button to fast forward — or to slow-motion forward from a pause.
Live TV recording is not permanent, unless you save it to the DVR hard disk drive. A live recording is erased
when you do any of the following:
• Turn off the DVR.
• Change channels.
• Watch more than 90 minutes of the same channel. The DVR buffers only the most recent 90 minutes.
STATUS BAR
The Status Bar appears when you pause, rewind, or fast-forward a program. The Status Bar shows the
duration of programs in the buffer and information about the program that is playing. The bar is blue for a
live program playing, red for a DVR recording playing, and white for other programs in the buffer.
SWAPPING BETWEEN TWO PROGRAMS
If your set-top box DVR features two tuners, you can buffer (temporarily record) two programs at the same
time — one on each tuner — by using the SWAP button. If you change channels without using SWAP, you lose the
buffered recording.
Follow these steps:
ask if you wish to swap tuners. Select your desired recording preference.
With the playback controls, you can pause, rewind, and fast-forward through recordings like
a VCR. You can also use the playback controls with live shows.
PAUSE
Pause a recording or live TV by pressing the pause key (||). Pressing pause more than once allows
frame-by-frame viewing. When you’re watching live TV, the screen remains paused and recording
continues for up to approximately 90 minutes, depending on the video format.
REWIND
Press the rewind key (<<) to rewind. Press it up to four times to increase the rewind speed. On the
fifth press, the program resumes normal play.
FAST-FORWARD
Press the fast-forward key (>>) to fast-forward a recording. For live TV, you can fast-forward after
you press pause (||) or rewind (<<).
SLOW-MOTION
To move in slow-motion forward or back, press pause (||) and then either fast-forward (>>) or
rewind.
PLAY
Press the play key (►) to resume playback after a pause, rewind, or fast-forward.
instant replay
To rewind 15 seconds and replay, press the replay key (REW). If your remote doesn’t have a replay
button, use the Page▼ key instead.
RETURN TO LIVE TV
After pausing or rewinding a live program, press the LIVE key to return to the live program. If your
remote doesn’t have a LIVE key, use the Page▼ key instead.
ONE-TOUCH RECORD
You can record or schedule a recording just by hitting the “REC”button on your remote. Press “REC” to:
• Save the recording of the program you’re watching.
• Schedule the recording of a program selected in the
Guide or Mini Guide.
• Schedule the recording of a program selected in Search results.
Follow any on-screen prompts for recording settings.
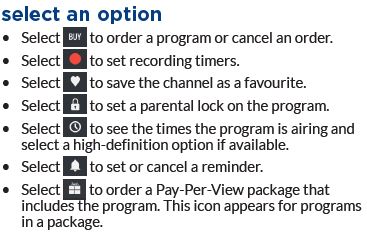
RECORD FROM THE PROGRAM INFO SCREEN
Use the “RECORD”icon to record a program or schedule a recording, and to cancel or modify a scheduled recording.
Select the “RECORD” icon and follow the on-screen prompts for additional options, as shown in the next panel.
The program information screen comes up when you hit the Info button or when you select a future program in the
Guide or Mini Guide.
RECORD TWO PROGRAMS AT SAME TIME
With a dual tuner you can record two programs at the
same time. Watch either program using the SWAP button
(or Page▼ if your remote does not have SWAP).
To record while watching a show:
1. Press “REC” to record the show on now.
2. Press SWAP (or Page▼) to switch tuners.
3. Locate the second program and press “REC”.
To record from the program guide:
1. Select the program you want to record from the
program guide.
2. Press “REC” to set up the first recording.
3. Select the second program.
4. Press “REC” to set up the second recording.
WATCH RECORDED PROGRAMS
Press the List button on your remote —
or, from the Quick Menu or Main Menu:
• Select DVR.
• Then select My Recordings.
• Select a show (press OK/Select).
![]()
For the complete On Demand catalogue, select the Full On Demand
Catalogue option from on the Dashboard or Dashboard menu.
The Full On Demand Catalogue offers the complete selection of On Demand shows.
1. On the On Demand Dashboard, do one of the following to bring up the Full On Demand Catalogue:
• Press the Menu key on your remote to bring up the On Demand Dashboard menu. Then select the “>” icon.
• Or scroll to the end of a row and select the Full On Demand Catalogue tile.
2. On the Full On Demand Catalogue menu, look through a list of categories. (Or press Last on your
remote to return to the On Demand Dashboard.)
3. Select a category you want to look through.
1. Select Pay-Per-View from the in Menu or Search Menu, or select the “PPV”icon from the Quick Menu.
2. Select the option you want from the Pay-Per-View Menu.
3. Browse the shows as shown in the next panel.
SELECT A SHOW FROM THE LIST
4. Highlight a show to see a description of the show.
5. Press OK/Select to get the details and the cost.
6. Select an option in the next panel.
Select HDTV from the Main Menu or Search Menu, or select the icon from the Quick Menu.
Select the option you want on the HDTV Menu:
- HD Channel Guide — for a program guide with just HD channels.
- By Channel — for a program guide with one HD channel at a time.
- By Time — for a program guide with just HD channels, 30 minutes at a time.
- HDTV Services — for a list of your HD channels, and to set up favourites or parental locks.
![]()
To add your first list of Favourite channels:
- Press the Fav button, or press Menu and select the Favourites icon.
- Select the icon to set up the list.
- Press OK/Select to edit List 01.
- To add or delete a Favourite channel to the list, press OK/Select on a channel.
- To confirm your selections, select the “Checkmark” icon.
To modify or add another Favourites list:
- Press Menu twice to go to the Main Menu.
- Select Setup.
- Select Favourites List Setup.
- Select a list to edit or select the “NEW”icon to add another list. You can have up to four lists.
To add or delete favourite channels
Press MENU twice and select Setup choose “Favourite Lists Setup”
Select the list to edit it.
- Choose the “Heart” icon at the bottom of the screen to edit the list.
- Remove or Add the Heart icon to a channel and use the Checkmark icon and the bottom of the screen to accept changes.
- To delete the list, select the “X” icon.
- The list can also be Renamed or Locked or Unlocked.
![]()
A great way to find shows is to look through a category of shows you like, such as
action movies. Check out the many categories of movies, sports, and kids shows.
BROWSE BY CATEGORY:
- Press Menu once and select the icon from the Quick Menu, or Press Menu twice and select Search from the Main Menu.
- Select Movies, Sports, or Kids.
- Look through the list for a genre or category you’re interested in. Arrow down to see even more choices.
- Select a genre or category.
- Look through the list for a show you want to watch.
- If there are seven shows on the screen, arrow down to see the next page.
- Arrow right to see upcoming shows.
- Select a show you want to watch.
- If the show isn’t airing then, select an action icon to set up a recording, favourite, reminder, or lock, or to find
other airtimes for the show.
SEARCH BY TITLE, NAME, OR KEYWORD:
- Press Menu once and select the icon from the Quick Menu, or
- Press Menu twice and select Search from the Main Menu.
Select the search you want to perform from the options your cable provider offers:
- Title
- Keyword
- Actor/Director
- TV & On Demand
- Pay-Per-View
- HDTV
Use the arrow keys to spell the search text.
- Select Delete to backspace.
- Select Space to add a space.
- To search, select Search Now.
- If search results come up as you type, scroll through and select a show.
- Look through the results for a program you want to watch.
- Select “Sort Results” to switch between alphabetical and date order.
- Select “Auto-Record” to record all of the current results and all future results of the search.
- Select “Save Search” to save the search. See the next page to use a saved search.
- Select a show you want to watch.
- Select an action icon to watch the show or to set up a recording, favourite, reminder, or lock.
![]()
A parental control lock requires a viewer to enter a 4-digit code to watch a show. You can easily set a lock on a show
when you’re watching TV or using the program guide.
To begin, press the Lock key on your remote.
If your remote doesn’t have a Lock key, go to the program
info screen:
• From the program guide, press the Info key.
• Or, while watching the show, press Info twice.
Then select the “Lock” icon.
As always, you can press the Last key to go back.
ENTER YOUR PIN
To set a lock on a show, enter your four-digit Locks PIN, and then press OK/Select.
If you haven’t set a Locks PIN before, a prompt asks you to enter the PIN twice to make sure you enter it correctly.
SELECT THE LOCKS
Select which locks you would like to set:
• Title of the show. To block viewing of that show.
• Channel number. To block viewing of all shows on that channel.
• Rating. To block viewing of all shows with that parental rating.
Press OK/Select on a lock to lock it or unlock it.
Select the “Left Arrow” icon to return to the show or guide.
To remove a lock on a show, use the same procedure.
LOCK SHOWS BY RATINGS
You can restrict viewing of shows by their parental ratings.
You can also restrict viewing by TV content ratings, such as level of violence or coarse language.
1. From the Parental Controls menu, select a ratings option:
• For TV parental ratings, select TV Rating Locks.
• For TV content ratings, select TV Content Locks.
• For movie parental ratings, select Movie Rating Locks.
2. For TV Content Locks, select the type of content:
• Violence
• Language
• Sexual Situations
• Suggestive Dialogue
3. Use the up and down arrow keys to move to a rating you want to lock or unlock.
4. Select the rating to lock or unlock it.
Locking a rating automatically locks that rating and every rating that is more restrictive. The
lock icon indicates a locked rating.
5. Press the Last key to return to the menu.
TiVo i-Guide R33 User Manual – CA English-compressed PDF Download